


Power outages can happen at any time, leaving your home without electricity and comfort. Homeowners in Katy, TX, and surrounding areas like Conroe rely on standby generators for peace of mind. Whole house generator testing ensures your backup system will work when you need it most. Regular checks help protect your family and keep daily life running smoothly during unexpected outages.
Many people overlook the importance of routine generator testing. A standby generator is only as reliable as its maintenance schedule. Without proper whole house generator testing, you risk unexpected failures during storms or emergencies. Taking a proactive approach keeps your system ready and dependable.
Knowing how to safely test your whole-home generator is essential for every homeowner. The right steps help you avoid damage and ensure safe operation. Whole house generator testing involves more than just flipping a switch and hoping for the best. Understanding the process gives you confidence and security year-round.
This guide will walk you through a step-by-step checklist for safe generator testing at home. You’ll learn what to look for and when to call a professional. With the right knowledge, you can keep your generator in top condition. Let’s explore the essential steps to keep your home protected and your generator ready for any situation.
Understanding Whole House Generators
Whole house generators are permanent fixtures that connect directly to your home’s electrical system. They automatically supply power during an outage, keeping lights, appliances, and essential systems running. Unlike smaller backup options, these generators provide seamless transitions without manual intervention. Homeowners in Conroe and Katy, TX, benefit from this reliable source of backup electricity.
Understanding how these systems work helps you appreciate the value of whole house generator testing. The generator senses when utility power fails and starts up within seconds. Once power returns, it safely switches your home back to the grid. This process protects sensitive electronics and prevents interruptions to daily routines.
Routine whole house generator testing checks all components, including the transfer switch, fuel supply, and electrical connections. These tests confirm the system will respond when needed. It’s important to follow a structured approach for safety and reliability. Regular testing also extends the lifespan of your generator and prevents costly repairs.
Homeowners should always review their generator’s manual before starting any checks. Each system may have unique features or requirements. If you notice unusual noises, leaks, or warning lights during whole house generator testing, contact a licensed electrician. Professional help ensures your generator remains safe and ready for any emergency.
Safety Precautions Before Testing
Before starting whole house generator testing, safety should always come first. Make sure the generator is in a well-ventilated area to prevent carbon monoxide buildup. Never test your system indoors or in an enclosed space. Clear away debris, leaves, or any flammable materials from around the unit.
Turn off all major appliances in your home before testing the generator. This step helps prevent power surges and protects sensitive electronics. Always use dry hands and wear rubber-soled shoes to reduce the risk of electrical shock. If you notice damaged wires or frayed connections, stop testing immediately.
Review the manufacturer’s instructions for your specific generator model before beginning any checks. Each system may have different safety recommendations or maintenance requirements. Keep a fire extinguisher nearby as an added precaution. If you feel unsure at any point, it’s best to consult a professional.
Whole house generator testing in Conroe and Katy, TX, should always include a visual inspection before starting. Look for signs of leaks, rust, or loose fittings around the generator. Make sure all vents and exhaust outlets are clear and unobstructed. Taking these steps helps ensure a safe and effective testing process for your home.
Tools Needed for Whole House Generator Testing
Having the right tools on hand makes whole house generator testing safer and more efficient. A flashlight is essential for checking your generator in low-light conditions or during a power outage. Keep a set of insulated screwdrivers and wrenches nearby to tighten connections or remove covers as needed. A multimeter helps you safely measure voltage and check electrical outputs during the testing process.
A pair of heavy-duty work gloves will protect your hands from sharp edges or hot surfaces around the generator. Safety glasses are also important to shield your eyes from debris or accidental sparks. Always have a notebook or checklist ready to record your observations and any maintenance tasks performed. This habit helps you track the condition of your system over time.
A fuel gauge or dipstick is useful for checking fuel levels before and after whole house generator testing. Make sure you have a clean rag to wipe away dirt or oil from connections and fittings. A small brush can help remove dust or debris from vents and air intakes. Keeping these tools organized ensures you’re prepared for every step of the testing process.
Homeowners in Katy, TX, and Conroe should store all generator tools in a dry, easily accessible location. Regularly inspect your tools for wear and replace them as needed to maintain safety. Using the proper equipment helps prevent accidents and ensures accurate whole house generator testing results. With the right tools, you can confidently keep your backup system ready for any emergency.
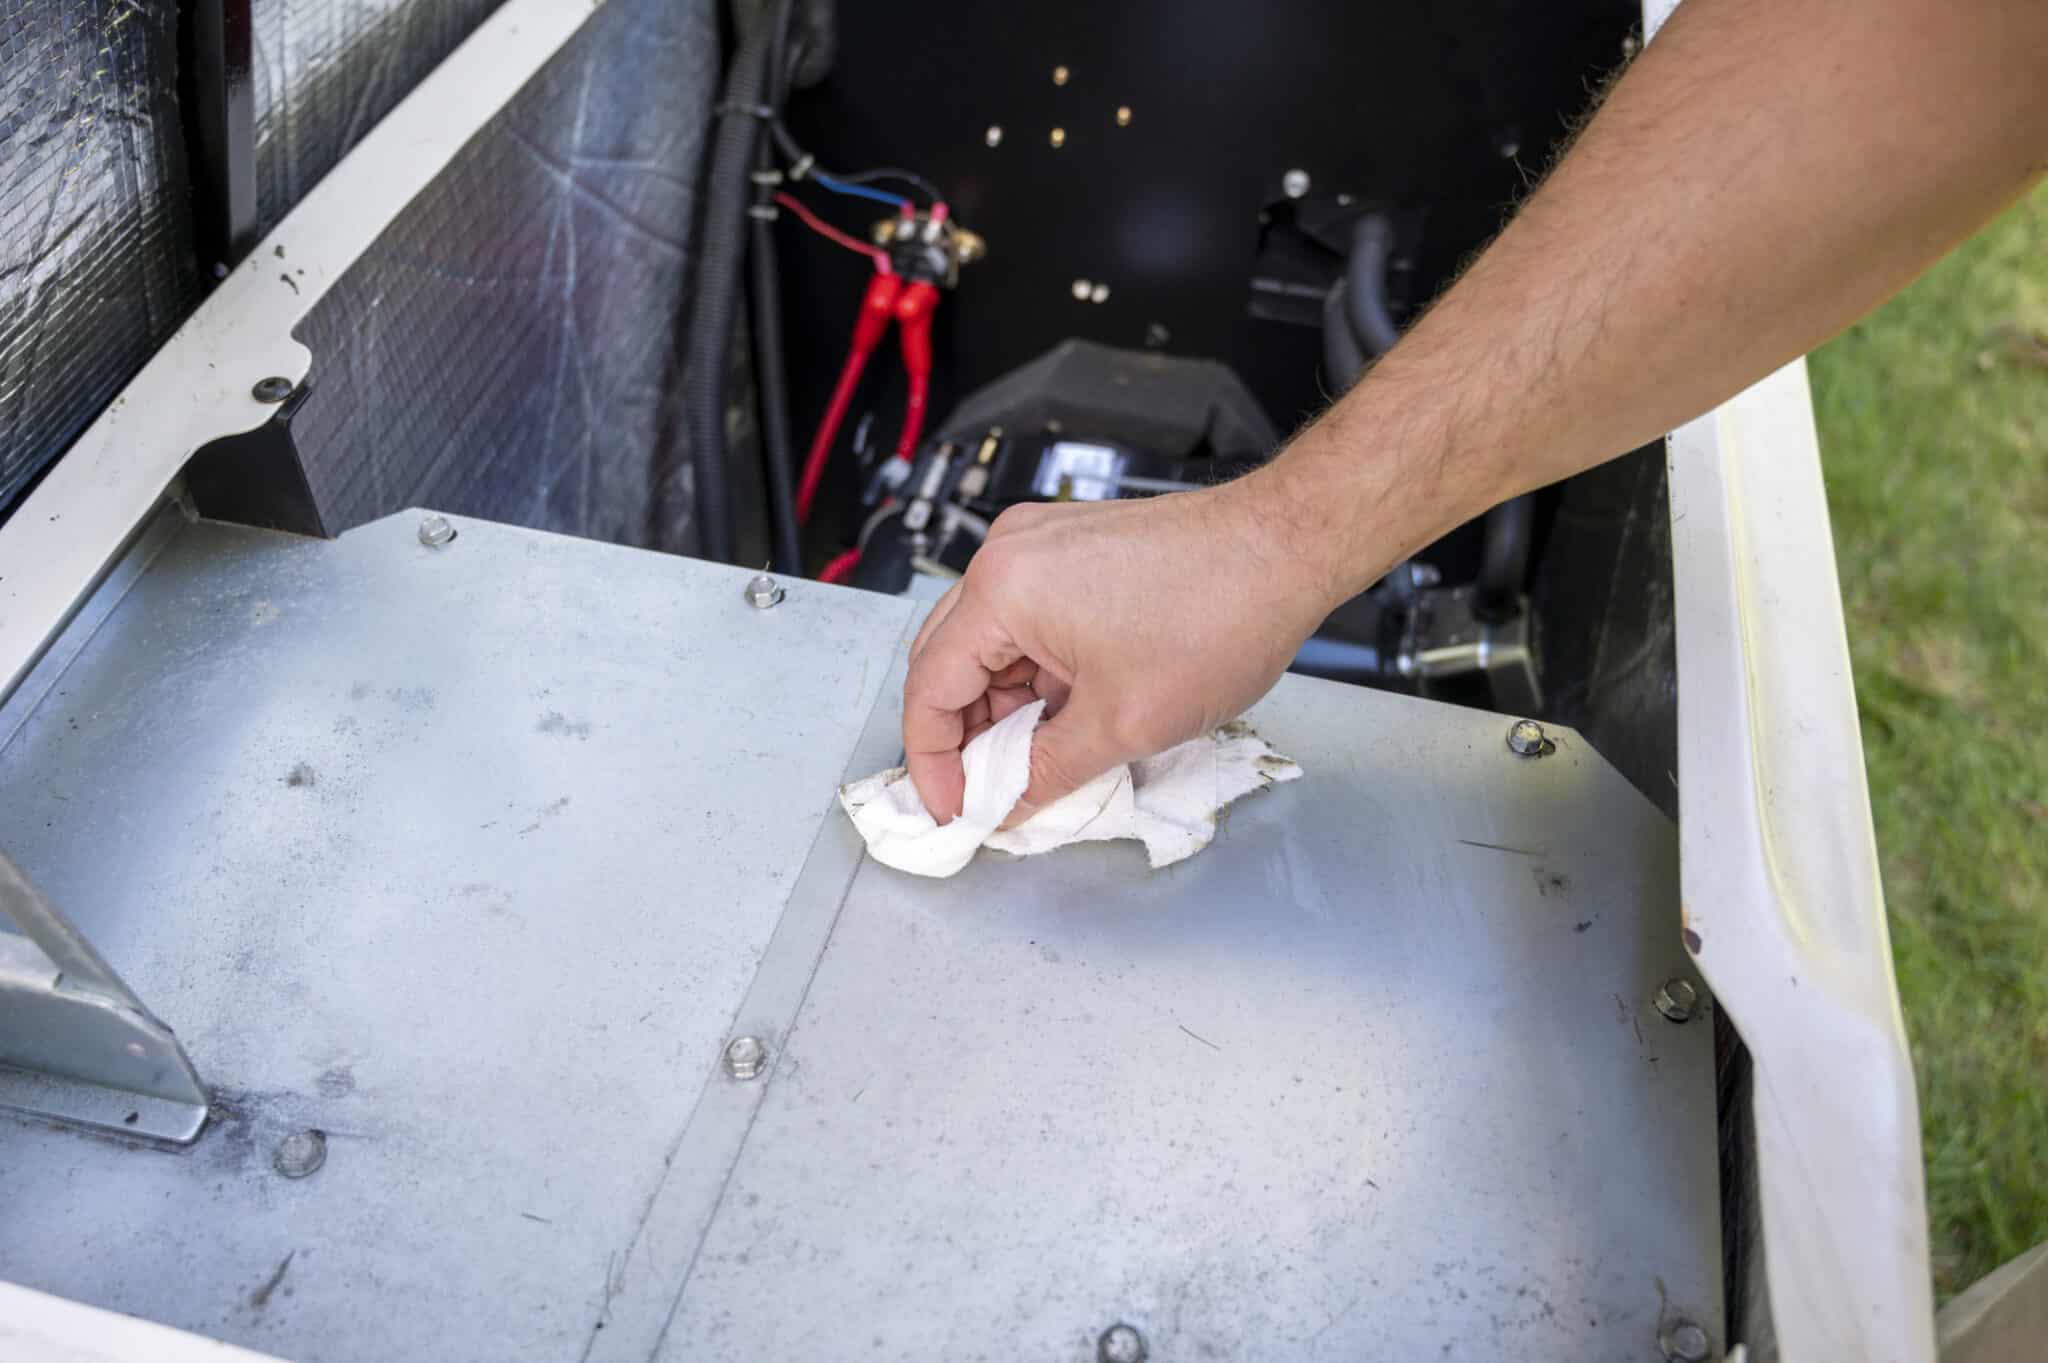
Inspecting the Generator’s Exterior and Connections
Begin your whole house generator testing by examining the exterior of the unit for any visible damage or wear. Look for dents, cracks, or corrosion on the housing, as these can affect performance. Check that all access panels and covers are secure and free from debris. A clean exterior helps prevent dirt from entering sensitive components during operation.
Next, inspect the generator’s electrical connections for signs of fraying, loose wires, or discoloration. Tighten any loose terminals with insulated tools to ensure a solid connection. Pay special attention to the main power cables and ground wires, as these are critical for safe operation. If you notice any damage, stop testing and contact a licensed electrician in Conroe or Katy, TX.
Continue your whole house generator testing by checking all fuel lines and fittings for leaks or cracks. Gently run a clean rag along the connections to detect any moisture or fuel odor. Make sure the fuel shutoff valve is accessible and functioning properly. Address any leaks or issues before proceeding to avoid safety hazards.
Finally, examine the air intake and exhaust vents for obstructions such as leaves, nests, or dirt. Clear away any blockages to maintain proper airflow and cooling. Confirm that the exhaust pipe is pointed away from doors and windows for safe operation. These steps ensure your generator is ready for further testing and reliable performance.
Checking Fuel and Fluid Levels
After inspecting the exterior and connections, move on to checking your generator’s fuel and fluid levels. Begin by reviewing the fuel tank to ensure it is at least half full before starting any whole house generator testing. Low fuel levels can cause the generator to run poorly or fail during an outage. If you notice any unusual smells or fuel discoloration, address the issue before proceeding.
Next, check the oil level using the dipstick provided by the manufacturer. Wipe the dipstick clean, reinsert it, and remove it to confirm the oil is within the recommended range. Low or dirty oil can damage the engine during operation and reduce reliability. Refill or change the oil if necessary, following the guidelines in your owner’s manual.
Inspect the coolant reservoir to ensure it is filled to the proper level, especially if your generator uses liquid cooling. Look for any signs of leaks or dried coolant around the cap and hoses. Maintaining correct coolant levels prevents overheating during whole house generator testing and real emergencies. Use only the coolant type specified by the manufacturer for your unit.
Finally, examine other essential fluids such as hydraulic or battery electrolyte, if applicable to your model. Make sure all caps are tightly secured and there are no signs of fluid leaks nearby. Keeping fluids at proper levels helps your generator run smoothly and safely in Conroe and Katy, TX. Regular checks and timely refills are crucial for dependable backup power when you need it most.
Whole House Generator Testing: Running a Manual Test
Once you have checked fuel and fluid levels, you are ready to perform a manual test of your standby generator. Locate the control panel and switch the system to “manual” or “test” mode, following your manufacturer’s instructions. This step allows you to observe how the generator starts and runs under controlled conditions. Listen for smooth engine operation and watch for any warning lights or unusual noises.
During whole house generator testing, pay close attention to the automatic transfer switch. This device should quickly shift your home’s electrical load from the utility to the generator. Check that lights, appliances, and essential systems power up as expected. If any circuits do not receive power, note the issue and consult a professional electrician.
Allow the generator to run for at least 15–20 minutes during testing. Monitor gauges for oil pressure, voltage output, and temperature throughout the process. Steady readings indicate the generator is operating within safe limits. If you notice fluctuations or alarms, stop the test and investigate further before using the system again.
Once the test is complete, return the control panel to its automatic or standby mode. Walk around the unit and check for leaks, odors, or unusual heat. Record your observations in your maintenance log for future reference. Regular whole house generator testing in Katy, TX, and Conroe ensures your backup system will work reliably when you need it most.
Monitoring Performance and Output
After running your manual test, focus on monitoring the generator’s performance and output. Watch the control panel for steady voltage and frequency readings throughout the process. Consistent output means your generator can handle your home’s electrical demands during an outage. If you see any warning indicators, address them before relying on the system.
Check that all essential appliances and systems remain powered without interruption during whole house generator testing. Flickering lights or tripped breakers may signal an issue with load capacity or wiring. Listen for any unusual noises from the generator while it operates under load. These sounds can point to mechanical problems that need prompt attention.
During the test, walk through your home to confirm every room receives power from the generator. Take note if certain outlets or circuits do not function as expected. This step helps you identify weak points in your backup system. Reliable power delivery is crucial for safety and comfort during emergencies in Conroe.
Once the test is complete, record your findings in your maintenance log for future reference. Include details about voltage, frequency, and any issues you observed during whole house generator testing. Consistent documentation helps track performance trends over time and supports timely maintenance decisions. Homeowners in Katy, TX, can use this information to ensure their generators remain ready for any situation.
Troubleshooting Common Generator Issues
Even with regular whole house generator testing, you may encounter issues that affect performance. Common problems include difficulty starting, low power output, or frequent shutdowns during operation. Addressing these quickly helps prevent more serious damage and keeps your backup system dependable. Always consult your generator’s manual for specific troubleshooting steps before making adjustments.
If your generator fails to start, check the battery connections and ensure the battery is fully charged. Corroded terminals or loose cables can prevent proper ignition. Inspect fuel levels and confirm that the fuel valve is open and unobstructed. Sometimes, a clogged air filter or dirty spark plug may also cause starting problems.
Low power output during whole house generator testing often points to overloaded circuits or faulty wiring. Reduce the electrical load by turning off non-essential appliances and retest the system. If output remains low, check for tripped breakers or blown fuses in the main panel. Persistent issues may require a professional electrician in Katy, TX, to inspect your system.
Frequent shutdowns or unusual noises can signal mechanical or electrical problems needing attention. Overheating, low oil pressure, or blocked vents are common causes of automatic shutdowns. Listen for knocking, grinding, or rattling sounds during operation, as these can indicate internal wear. If troubleshooting does not resolve the issue, schedule a service call with a licensed technician in Conroe.

Frequently Asked Questions
What is included in a whole house generator testing checklist?
A whole house generator testing checklist includes inspecting fuel levels, checking oil and coolant, and examining battery connections for corrosion. Homeowners should also test the automatic transfer switch to ensure it operates smoothly during power loss. Routine whole house generator testing involves running the system under load to confirm reliable performance. Finally, reviewing error codes and confirming all safety features work properly helps maintain generator readiness year-round.
How often should whole house generator testing be performed?
Whole house generator testing should be performed at least once a month to ensure reliable operation during emergencies. Scheduling additional checks before storm season or extended trips adds extra peace of mind. Regular testing helps catch minor issues early and keeps the system in top condition. Consistent whole house generator testing also extends the lifespan of your backup power solution.
What safety precautions are needed during generator testing?
Always turn off the main power supply before starting whole house generator testing to avoid electrical hazards. Wear protective gloves and eyewear to prevent injuries while inspecting connections and components. Keep the testing area clear of flammable materials and ensure proper ventilation to reduce the risk of carbon monoxide exposure. Follow manufacturer guidelines throughout whole house generator testing to maintain safety and protect your equipment from accidental damage.
How do I know if my generator passes the testing checklist?
If your system starts easily, runs smoothly, and supplies power during whole house generator testing, it passes the checklist. All warning lights should remain off, and no error codes should appear on the control panel. Safety features must work as intended, and the automatic transfer switch should function without delays. Consistent performance throughout the test confirms your generator is ready for unexpected outages.
What tools are required for generator testing at home?
Homeowners need a few basic tools for whole house generator testing, including a flashlight, insulated screwdrivers, and a multimeter. Keep protective gloves and safety glasses handy for safe inspection of electrical connections and components. A clean rag helps wipe away dust or debris during whole house generator testing. Always refer to your generator’s manual for any special tools recommended by the manufacturer.