


Curious about the impact ceiling fans can have on your home? Installing or upgrading ceiling fans is one of the best ways to enhance comfort and style in any room.
Whether you’re looking to replace an old, noisy fan or add a new one to a space that gets too warm, we’ve got you covered.
In this guide, we’ll walk you through the steps of installing and upgrading ceiling fans, emphasizing the importance of hiring professionals to get the job done right.
Why Install a Ceiling Fan?
Ceiling fans are more than just decorative pieces; they offer numerous benefits:
- Improved Air Circulation: Ceiling fans help distribute air evenly throughout the room, making it feel cooler in the summer and warmer in the winter.
- Energy Efficiency: By improving air circulation, ceiling fans can reduce the need for air conditioning and heating, leading to lower energy bills.
- Aesthetic Appeal: Modern ceiling fans come in a variety of styles, adding a touch of elegance to any room.
- Cost-Effective Cooling: Compared to air conditioners, ceiling fans are much cheaper to run, making them a cost-effective cooling solution.
- Versatility: Ceiling fans are suitable for various rooms, including bedrooms, living rooms, kitchens, and outdoor patios.

Choosing the Right Ceiling Fan
Selecting the right ceiling fan involves considering several key factors to ensure it effectively cools your space while complementing your home décor.
Size of the Room
The size of the room is crucial in determining the appropriate blade span for your ceiling fans. Smaller rooms require fans with smaller blade spans, while larger rooms need fans with larger spans to ensure proper air circulation.
For very spacious areas, choosing a fan with an even wider blade span ensures that the entire room benefits from the cooling effect.
Ceiling Height
Ceiling height is another important consideration. For optimal performance, ceiling fans should be installed about eight to nine feet above the floor. If your ceilings are particularly high, a fan with a downrod can help lower the fan to the ideal height.
Conversely, for rooms with low ceilings, a low-profile or flush-mount ceiling fan is more appropriate to maintain safety and efficiency.
Style and Finish
Your ceiling fans should harmonize with your room’s décor. Whether your style leans towards traditional, contemporary, or something in between, there are numerous designs and finishes to choose from.
Sleek metal finishes are perfect for modern or industrial spaces, while rustic wood finishes complement farmhouse or traditional settings. Neutral colors offer versatility and can blend with a variety of décor styles.
Blade Material and Pitch
The material and pitch of the blades significantly influence the fan’s performance and noise level. Wooden blades tend to be quieter, making them ideal for bedrooms and living rooms, while metal blades may generate more noise, suitable for industrial or commercial spaces.
The blade pitch, or angle, should be within the range of twelve to fifteen degrees for optimal air movement. A higher pitch moves more air but may require a stronger motor to function efficiently.
Motor Quality
Investing in a fan with a high-quality motor is essential for reliable and quiet operation. DC motors are more energy-efficient compared to traditional AC motors and provide smoother operation with more precise speed control.
They are also lighter and more compact, making them easier to install and less obtrusive. High-quality motors not only ensure a longer lifespan for the fan but also contribute to quieter performance, enhancing the comfort and tranquility of your home.
By carefully considering the size of the room, ceiling height, style and finish, blade material and pitch, and motor quality, you can select a ceiling fan that not only cools your space efficiently but also enhances the overall aesthetic and comfort of your home.
Pre-Installation Preparations
Before installing your new ceiling fan, there are a few preparations you need to make. Remember, for safety and the best results, it’s always recommended to hire a professional rather than attempting a DIY approach:
- Turn Off Power: Safety first! Ensure the power is turned off at the circuit breaker before you begin any electrical work. Use a voltage tester to confirm that the power is off.
- Gather Tools and Materials: You’ll need a ladder, screwdriver, pliers, wire strippers, wire nuts, electrical tape, a voltage tester, and a drill. Make sure you have everything on hand before starting.
- Read the Instructions: Each fan model comes with specific instructions. Read them thoroughly to familiarize yourself with the process and ensure you understand the steps involved.
- Check the Ceiling Box: Ensure the existing ceiling box is rated for fan support. If it’s not, you’ll need to replace it with a fan-rated box to ensure safe installation.
- Choose the Right Mounting Option: Depending on your ceiling type (standard, angled, or low), select the appropriate mounting option: standard mount, angled mount, or flush mount.
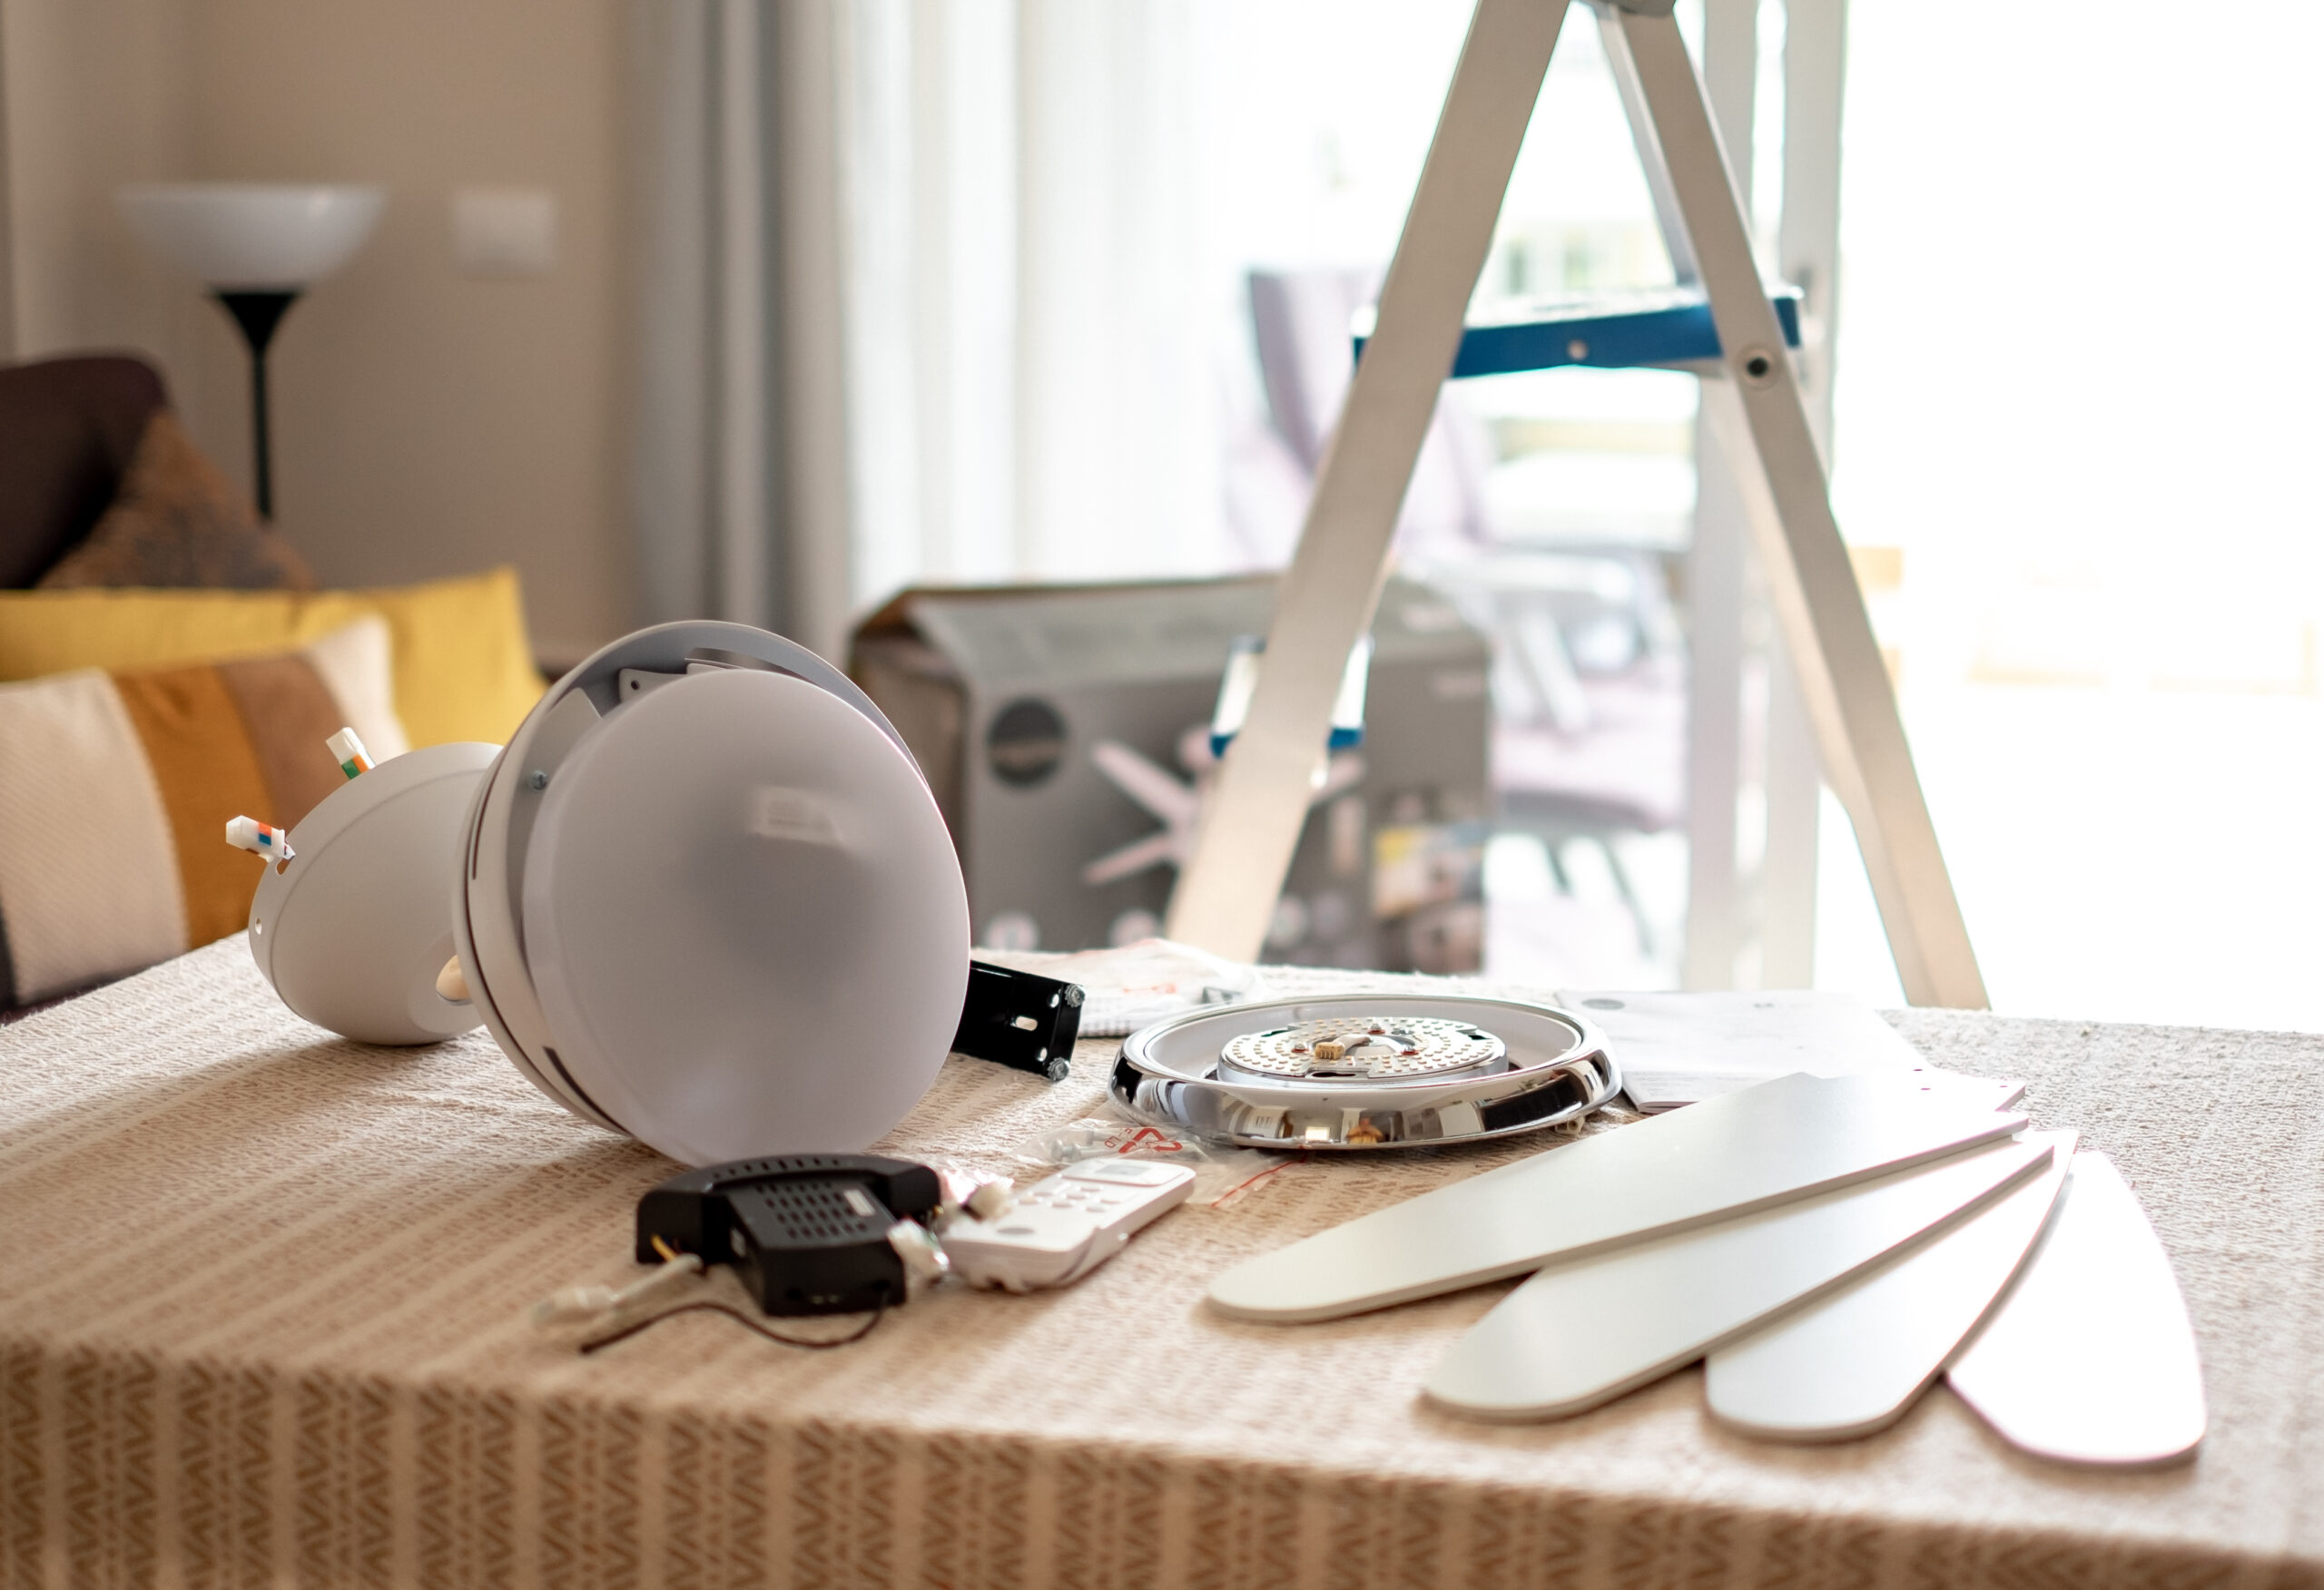
Step-by-Step Guide to Ceiling Fan Installation
Step 1: Install the Mounting Bracket
To start, you’ll need to install the mounting bracket, which will securely hold the ceiling fan to the ceiling. First, use a stud finder to locate a ceiling joist and mark its location; the ceiling fan must be attached to a joist for stability.
Once you’ve identified the joist, align the mounting bracket with it and secure it using screws, ensuring it is firmly attached to support the ceiling fan’s weight. If the electrical box is not connected to a joist, you can use an expandable ceiling fan brace to provide adequate support.
Step 2: Wiring the Fan
Wiring the ceiling fan can be challenging, so consider hiring a professional if you are uncomfortable working with electricity. Begin by matching the wires from the ceiling fan to those in the ceiling.
Typically, this involves connecting the black (hot) wire from the ceiling to the black wire from the ceiling fan, the white (neutral) wire from the ceiling to the white wire from the ceiling fans, and the green or bare (ground) wire from the ceiling to the green or bare wire from the ceiling fan.
Once connected, secure the wires with wire nuts and wrap them with electrical tape for added security. Tuck the wires neatly into the electrical box to keep them organized and safe.
Step 3: Attach the Fan Motor
With the mounting bracket and wiring in place, you can now attach the ceiling fan motor. Lift the motor and attach it to the mounting bracket, ensuring it is securely fastened according to the manufacturer’s instructions.
This step may require an extra pair of hands to hold the ceiling fan motor in place while you secure it. After the motor is securely attached, slide the canopy over the bracket and secure it with the provided screws.
The canopy will cover the mounting bracket and electrical connections, giving the installation a clean and finished appearance.
Step 4: Attach the Fan Blades
Finally, it’s time to attach the ceiling fan blades. Begin by securing each blade to the ceiling fan motor using the provided screws and blade arms. Make sure each blade is firmly attached to prevent any wobbling.
Once all blades are attached, test the ceiling fan to ensure it is balanced. If the ceiling fan wobbles, you may need to adjust the blades or use a balancing kit, which typically includes small weights to attach to the blades. Balancing the blades will ensure the smooth and efficient operation of your ceiling fan.
Upgrading Your Ceiling Fan
If you already have a ceiling fans but want to upgrade it, here are some steps to consider:
- Replace the Blades: Swapping out old blades for new ones can give your fan a fresh look. Ensure the new blades are compatible with your fan model. Different blade shapes and materials can significantly change the fan’s appearance and performance.
- Add a Light Kit: Many fans have the option to add a light kit. This can be a great way to improve lighting in the room while updating the fan’s appearance. Ensure the light kit is compatible with your fan and follow the manufacturer’s installation instructions.
- Upgrade the Remote: If your fan doesn’t already have a remote control, consider upgrading to a model that includes one. This adds convenience and allows for easier control of the fan’s speed and light settings. Some advanced remotes also include smart home integration, allowing you to control the fan via a smartphone app or voice commands.
- Install Smart Controls: Modern ceiling fans often come with smart controls that can be integrated with home automation systems. This allows you to control the fan’s speed, direction, and lighting with your smartphone or voice assistant.
The Importance of Professional Installation
While installing or upgrading ceiling fans might seem like a simple DIY project, it’s often best to hire a professional electrician. Here’s why:
- Safety: Working with electricity can be dangerous. A professional electrician has the training and experience to handle electrical work safely. They are also equipped with the necessary tools to ensure a safe installation.
- Proper Installation: Improper installation can lead to a variety of issues, including wobbling, noise, and even electrical fires. A professional will ensure the fan is installed correctly and securely.
- Warranty Protection: Many ceiling fans come with a warranty that requires professional installation. Hiring an electrician can help protect your investment and ensure that you comply with warranty terms.
- Time-Saving: Professional electricians can complete the installation quickly and efficiently, saving you time and hassle.
- Expert Advice: Professionals can provide valuable advice on the best fan models, placement, and features to suit your needs and room conditions.
Tips for Maintaining Your Ceiling Fan
To keep your ceiling fans running smoothly and efficiently, regular maintenance is essential. Here are some tips:
- Clean the Blades: Dust and dirt can accumulate on the blades, causing them to wobble and reducing their efficiency. Clean the blades regularly with a soft cloth or a microfiber duster.
- Check for Loose Screws: Periodically check all the screws and connections to ensure they are tight. Loose screws can cause the fan to wobble and make noise.
- Lubricate the Motor: Some fans require periodic lubrication to keep the motor running smoothly. Check the manufacturer’s instructions to see if this is necessary for your model and use the recommended lubricant.
- Inspect the Mounting: Ensure the mounting bracket and electrical box are secure and not showing signs of wear or damage.
- Switch Fan Direction Seasonally: In the summer, the fan blades should rotate counterclockwise to create a cooling breeze. In the winter, switch the direction clockwise to circulate warm air trapped near the ceiling.
Common Ceiling Fan Problems and Solutions
Even with proper installation and maintenance, ceiling fans can sometimes encounter problems. Here are some common issues and how to address them:
- Wobbling: If your fan wobbles, check the blades for dirt and ensure they are properly balanced. Tighten any loose screws and use a balancing kit if necessary.
- Noise: Unusual noises can be caused by loose parts or a need for lubrication. Inspect the fan and make any necessary adjustments. If the noise persists, it could indicate a more serious issue with the motor or electrical connections.
- Not Working: If the fan doesn’t turn on, check the electrical connections and the circuit breaker. If everything looks fine, it may be a problem with the fan’s motor or internal wiring, which may require professional repair.
- Poor Airflow: If the fan isn’t circulating air effectively, ensure it is installed at the correct height and that the blades are clean and properly angled. Also, check the fan speed settings.
- Remote Control Issues: If your remote control isn’t working, check the batteries and ensure there are no obstructions between the remote and the fan. Reprogramming the remote or resetting the fan might be necessary.
Upgrading to Energy-Efficient Fans
If you’re looking to save on energy costs, consider upgrading to an energy-efficient ceiling fan. Here’s what to look for:
- Energy Star Rating: Fans with the Energy Star rating are certified to use less energy and provide better performance. They are designed to circulate air more efficiently and can save you money on your energy bills.
- Efficient Motors: Look for fans with DC motors, which are more efficient than traditional AC motors. DC motors use up to 70% less energy and are typically quieter and more durable.
- Smart Controls: Modern fans often come with smart controls that allow you to adjust settings via a smartphone app, maximizing efficiency. These controls can help you optimize fan usage based on room occupancy and temperature, further reducing energy consumption.
- LED Lighting: If your fan includes a light kit, opt for models with LED lighting. LEDs use less energy and last longer than traditional bulbs, making them a more sustainable choice.
Ready to install or upgrade your ceiling fan?
Don’t risk doing it yourself. The Local Electrician is here to help. Our team of experienced professionals in Katy, TX, and Richmond, TX, can handle all your ceiling fan needs. Contact us today to schedule an appointment and enjoy the benefits of professionally installed ceiling fans.
We offer fast, reliable service, ensuring your new fan is installed safely and efficiently. Whether you need a new installation or an upgrade, trust The Local Electrician for all your ceiling fan projects.
FAQs
How long does it take to install a ceiling fan?
The installation time can vary, but typically it takes about 1-2 hours for a professional to install a ceiling fan. Factors such as the type of ceiling, the complexity of the installation, and whether any electrical work is needed can affect the time required.
Can I install a ceiling fan without a downrod on high ceilings?
For high ceilings, it’s recommended to use a downrod to ensure optimal air circulation. Without a downrod, the fan may not effectively circulate air throughout the room. Downrods come in various lengths to accommodate different ceiling heights.
How often should I clean my ceiling fan?
You should clean your ceiling fan at least once a month to prevent dust buildup. Regular cleaning ensures that the fan operates efficiently and reduces the risk of wobbling or noise caused by dirt and debris on the blades.
Why is my ceiling fan making a humming noise?
A humming noise can be caused by loose parts, electrical issues, or the need for lubrication. It’s best to have a professional inspect it to determine the cause and make any necessary repairs. Persistent humming could indicate a problem with the motor or other internal components.
Can I add a light kit to any ceiling fan?
Not all ceiling fans are compatible with light kits. Check the manufacturer’s instructions to see if your fan can accommodate one. If your fan is compatible, follow the installation instructions carefully to ensure safe and proper operation.
Now that you know how to install and upgrade ceiling fans, what are you waiting for? Contact The Local Electrician today and transform your home with a new ceiling fan! We are committed to providing top-notch service and ensuring your satisfaction with every installation. Enjoy the benefits of improved air circulation, energy efficiency, and enhanced aesthetics in your home.